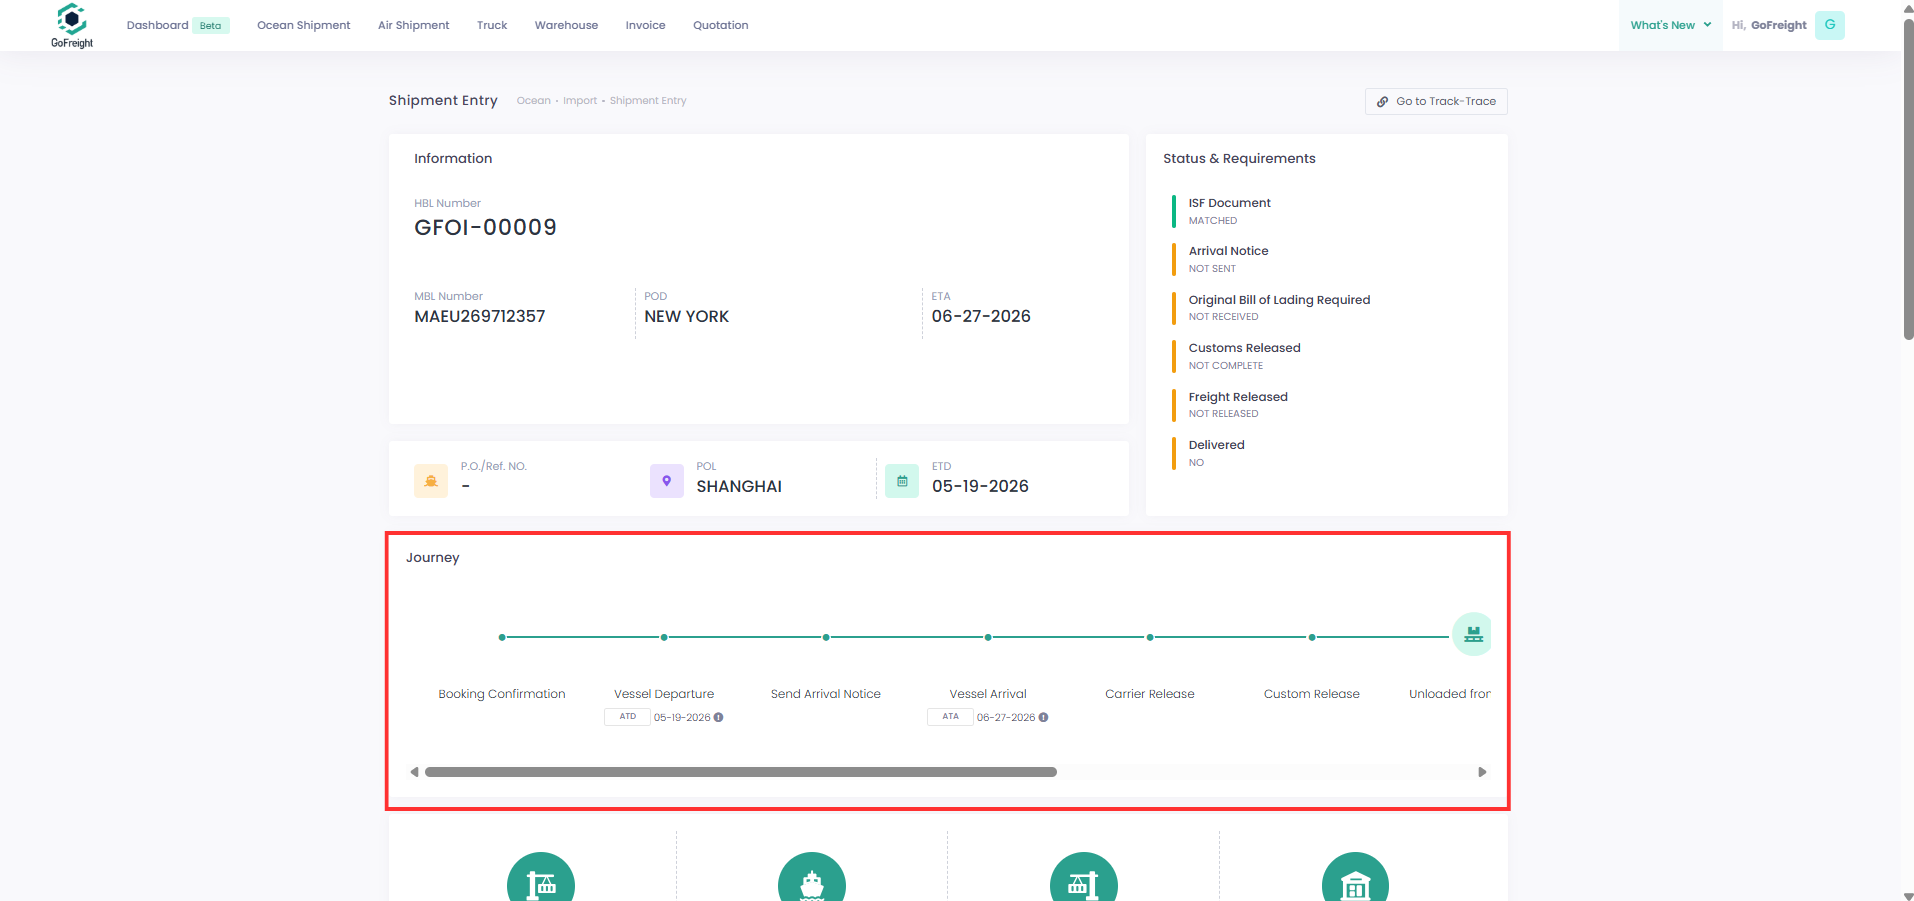
To provide greater flexibility in tracking shipment progress, GoFreight now allows users to customize Shipment Journey Milestones beyond the default settings. Customized milestones can be displayed on both the House B/L List, HAWB List, and the Customer Portal, providing clearer visibility into shipment status and progress.
Permission Requirement
This feature requires the Visibility EDI add-on service. By default, only users with the following roles can configure Shipment Journey Milestone settings:
- General Manager
- Operation Manager
What You Can Customize
GoFreight now allows users to add custom milestones to support your company’s own operation workflow. The following four modules support milestone customization:
- Ocean Import
- Ocean Export
- Air Import
- Air Export
Each module has its own milestone setup. Changes in one module do not affect the others.
In addition, milestone advancement works differently for preset and custom milestones:
- Preset milestones only move forward automatically
- GoFreight receives shipment EDI updates from the carrier.
- A user enters the corresponding date or time field on the shipment page.
- Custom milestones do not move forward automatically
- Users need to manually advance custom milestones when the step is completed.
Navigate to Journey Setting
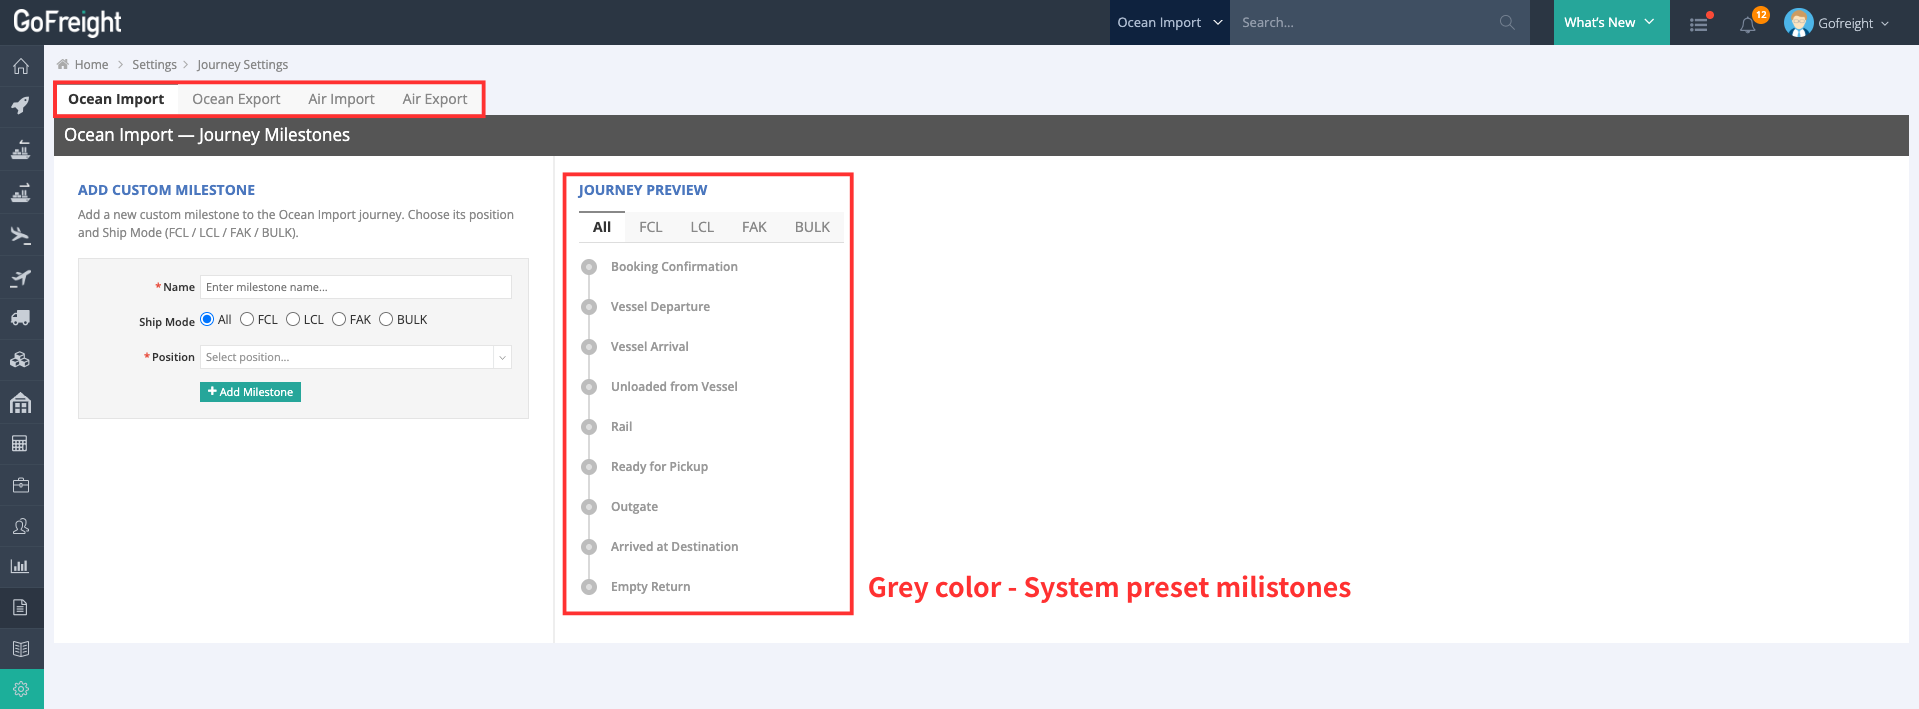
- Go to Setting > Journey Settings
- Select the module you want to customize
- Milestones with a gray background are system preset journey milestones.
- System preset milestones cannot be renamed, reordered, or deleted.
Add Custom Milestones for Ocean Shipment
- Select the Ocean Import or Ocean Export tab.
- Fill in the required fields:
- Name: Enter the name of the custom milestone.
- Ship Mode: Select which type of Ocean Shipment should display this custom milestone.
- Position: Choose where the milestone appears in the journey.
Example: To add a custom milestone for sending arrival notices
- Name: Send Arrival Notice
- Ship Mode: FCL
- Position: After Vessel Departure
This means the custom milestone will appear after Vessel Departure for FCL Ocean Shipment only. You can preview how it will look in the journey preview area on the side.
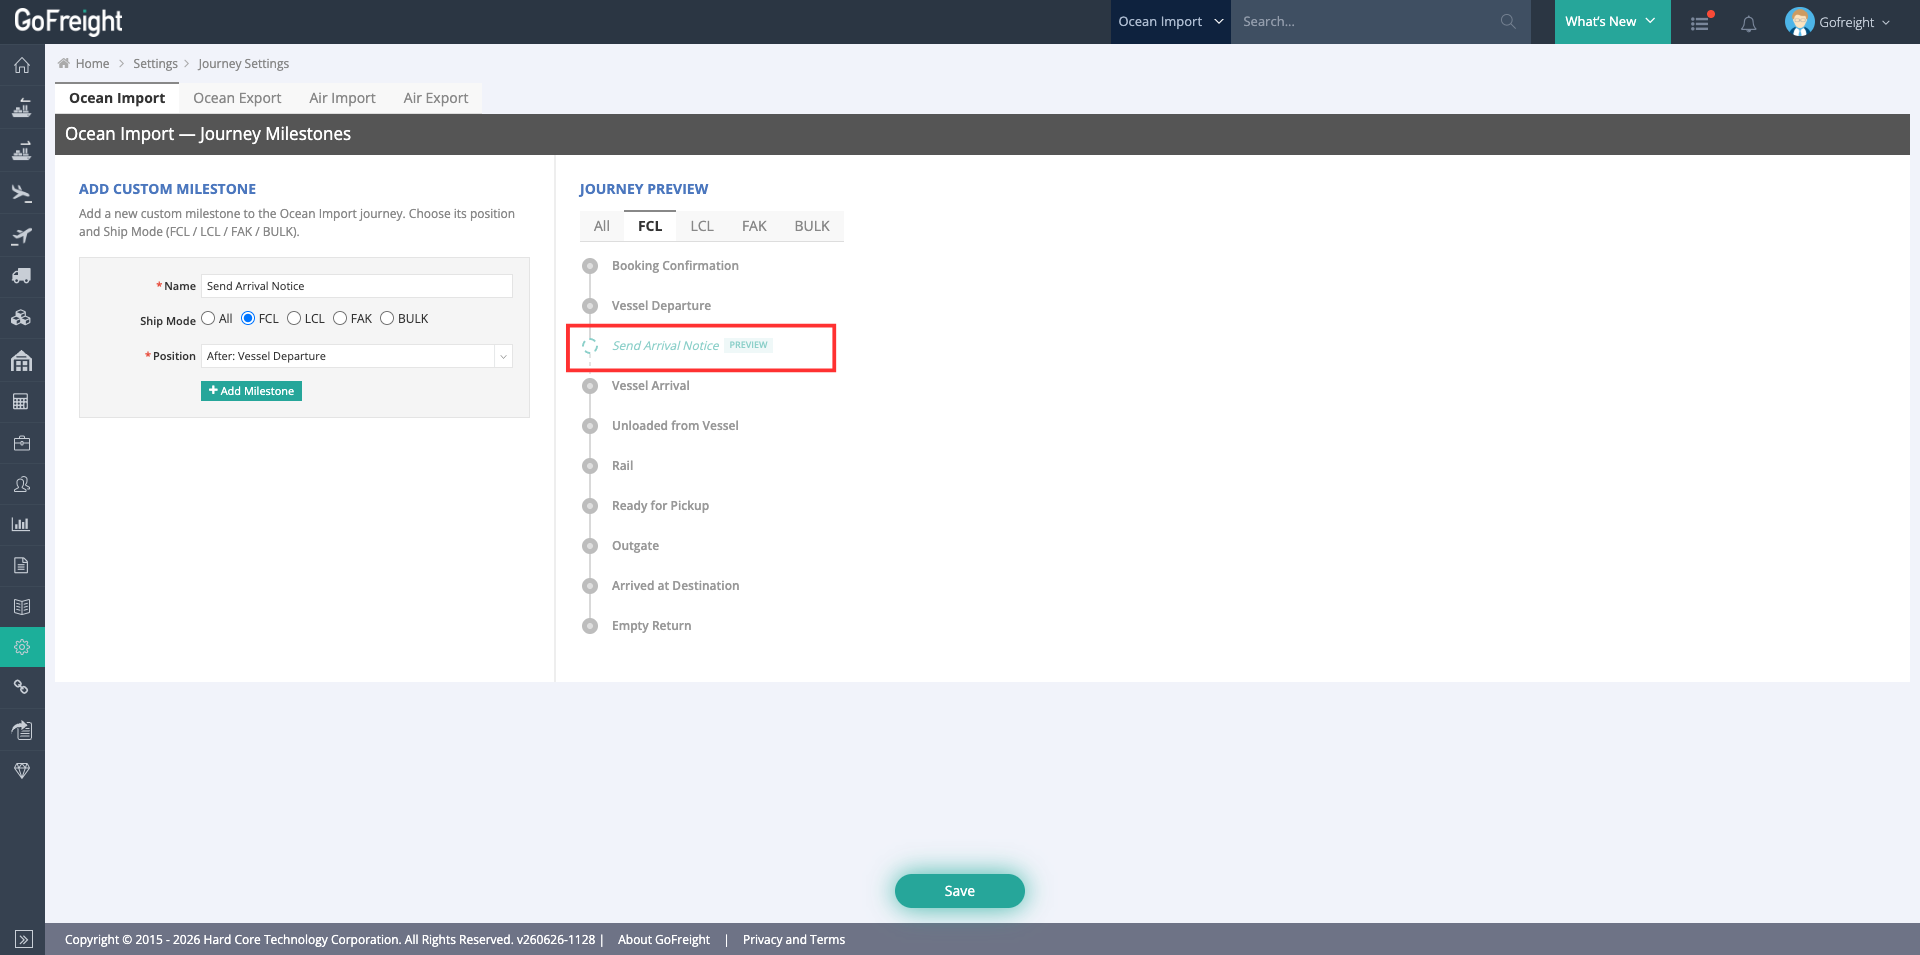
- Click “+ Add Milestone” and “Save”
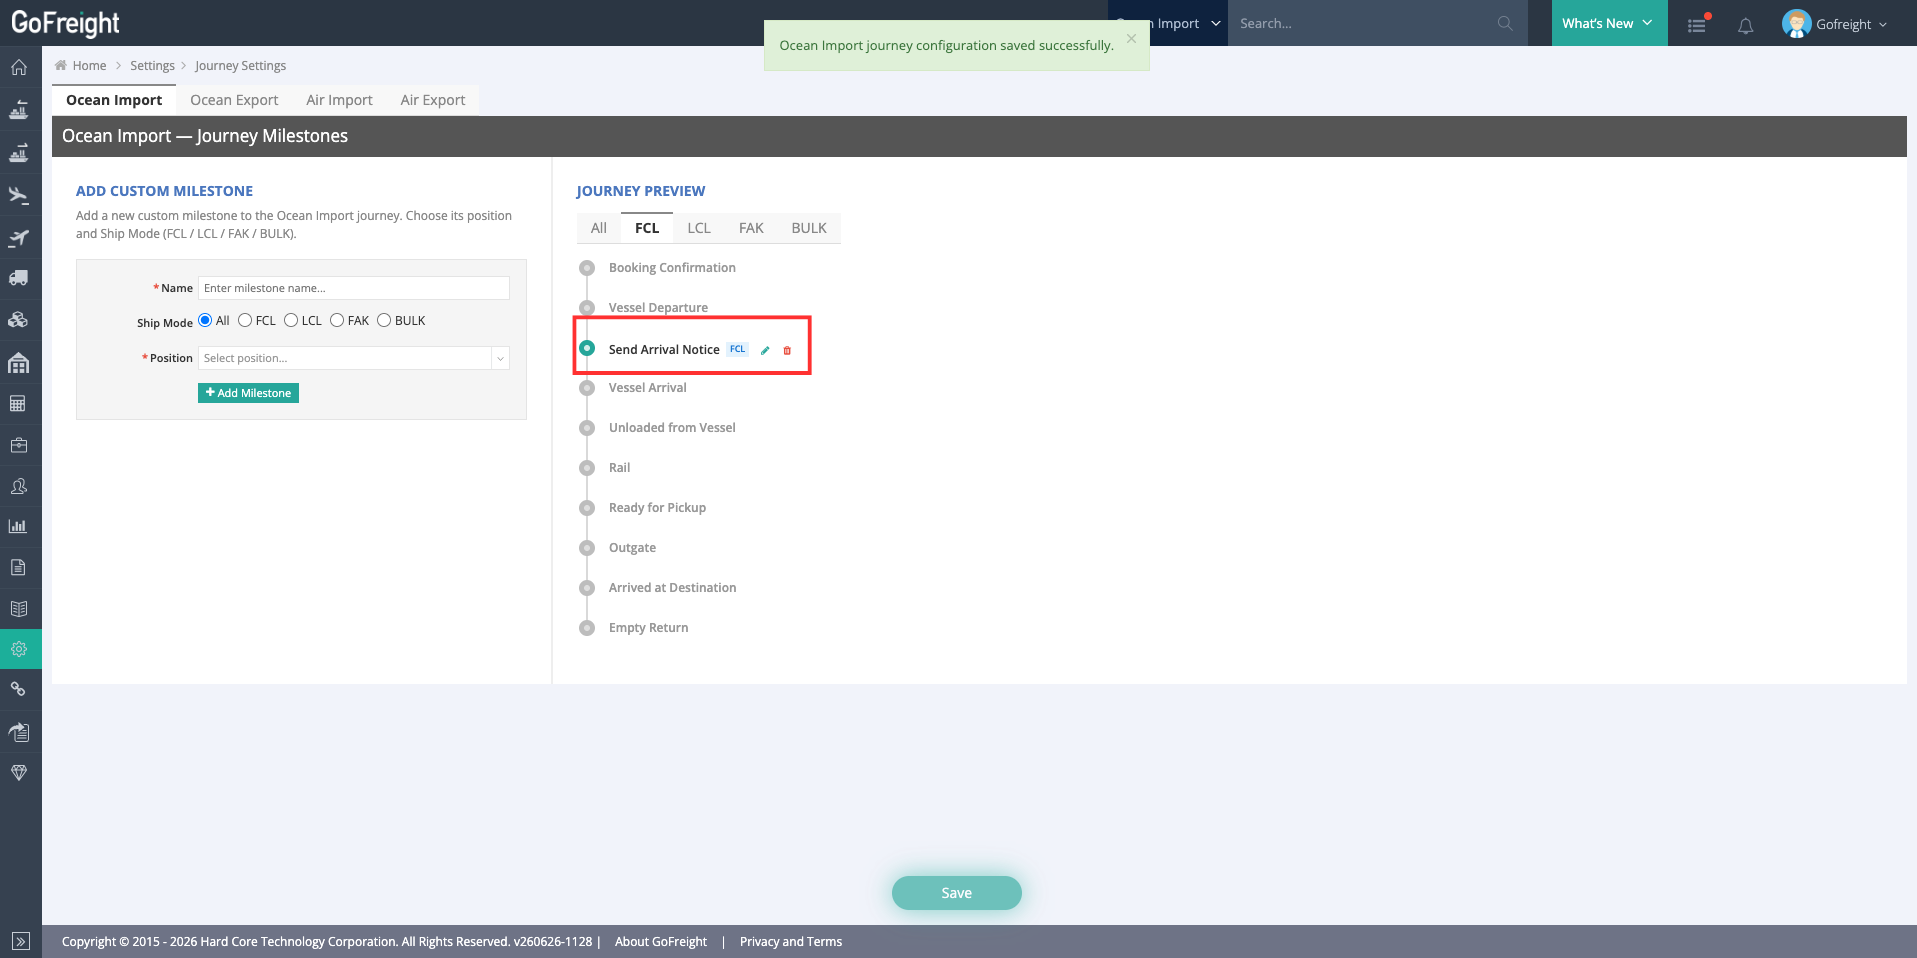
After the custom milestone is officially added in the journey, you can move the cursor over it to make changes.
- Click the pencil icon to rename it.
- Click the trash icon to delete it.
Remember to click “Save” to apply your changes to the current tab after adding, renaming, or deleting a custom milestone,
Note: If the custom milestone is added to the wrong position, delete it first, then add it again in the correct position.
Add Custom Milestones for Air Shipment
- Select the Air Import or Air Export tab.
- Fill in the required fields:
- Name: Enter the name of the custom milestone.
- Position: Choose where the milestone appears in the journey
- Click + Add Milestone and Save
After the custom milestone is officially added in the journey, you can move the cursor over it to make changes.
- Click the pencil icon to rename it.
- Click the trash icon to delete it.
Remember to click “Save” to apply your changes to the current tab after adding, renaming, or deleting a custom milestone,
Note: If the custom milestone is added to the wrong position, delete it first, then add it again in the correct position.
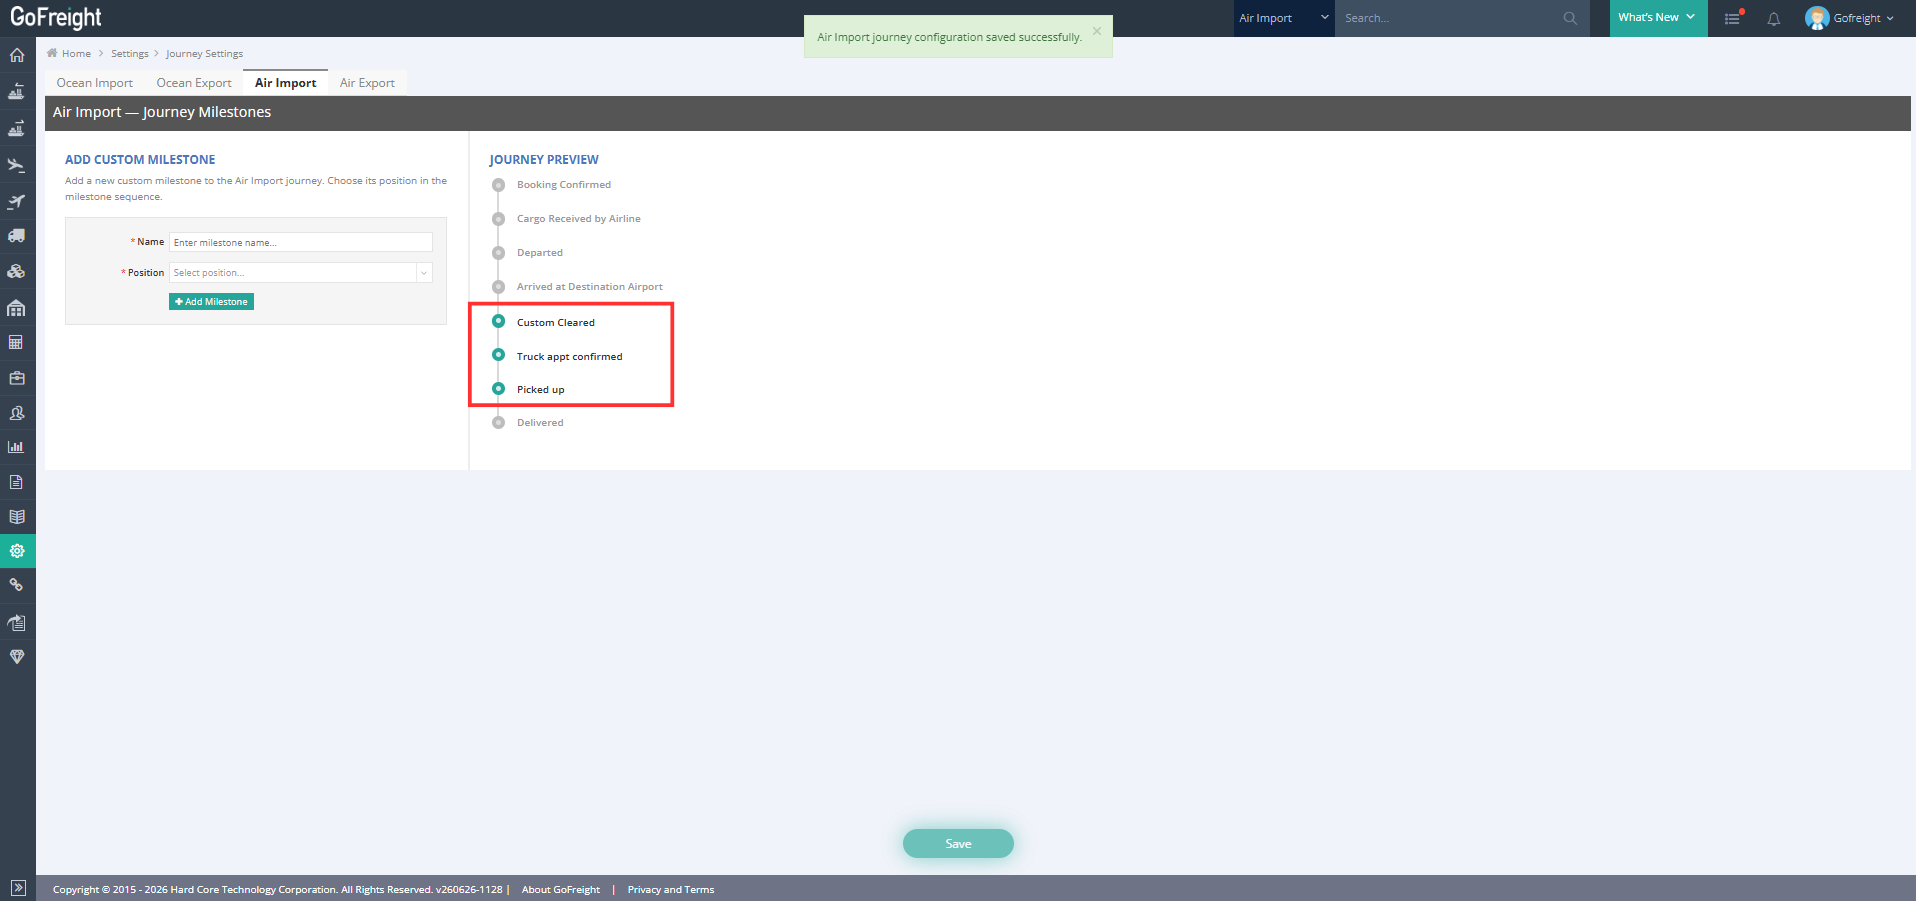
Example: Add multiple custom milestones
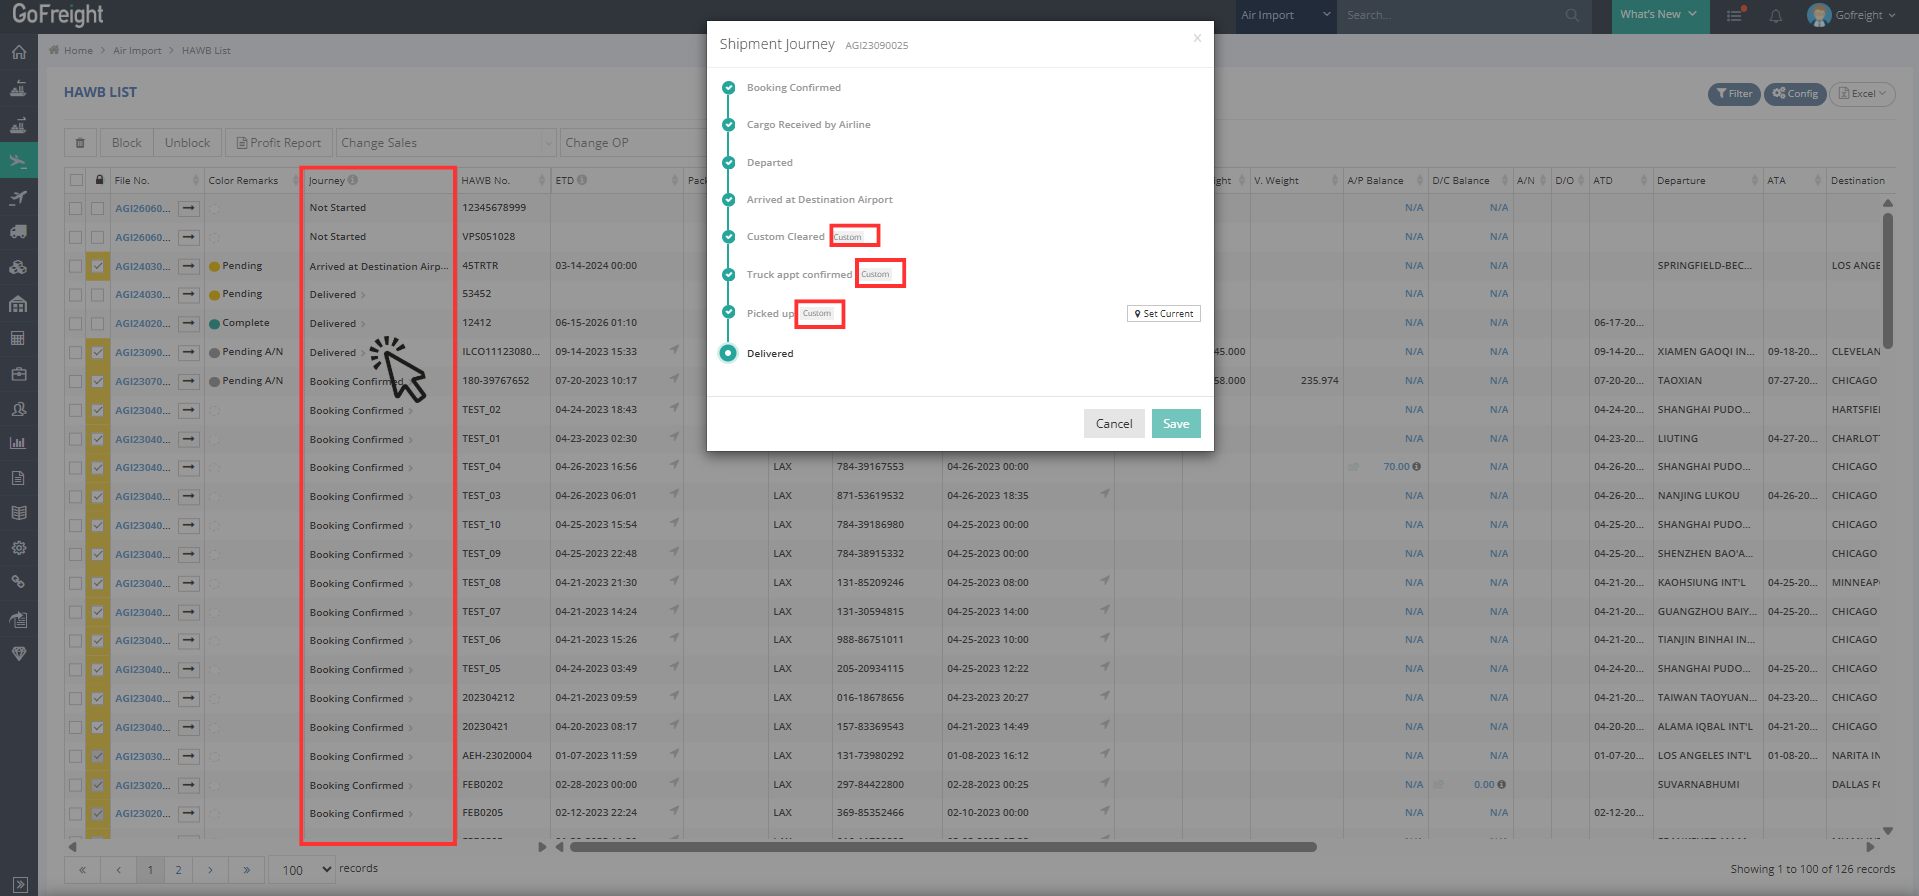
- Name: Custom Cleared Position: After Arrived at Destination Airport
- Name: Truck appt confirmed Position: After Custom Cleared
- Name: Picked up Position: After Truck appt confirmed
How to Advance Custom Milestones?
Milestones advance differently depending on whether they are preset or custom. Below are the common scenarios.
- Scenario 1: Preset Milestones Advance Automatically
- Preset milestones can only advance automatically by: Carrier EDI updates & Date/time fields entered on the shipment page
Example:
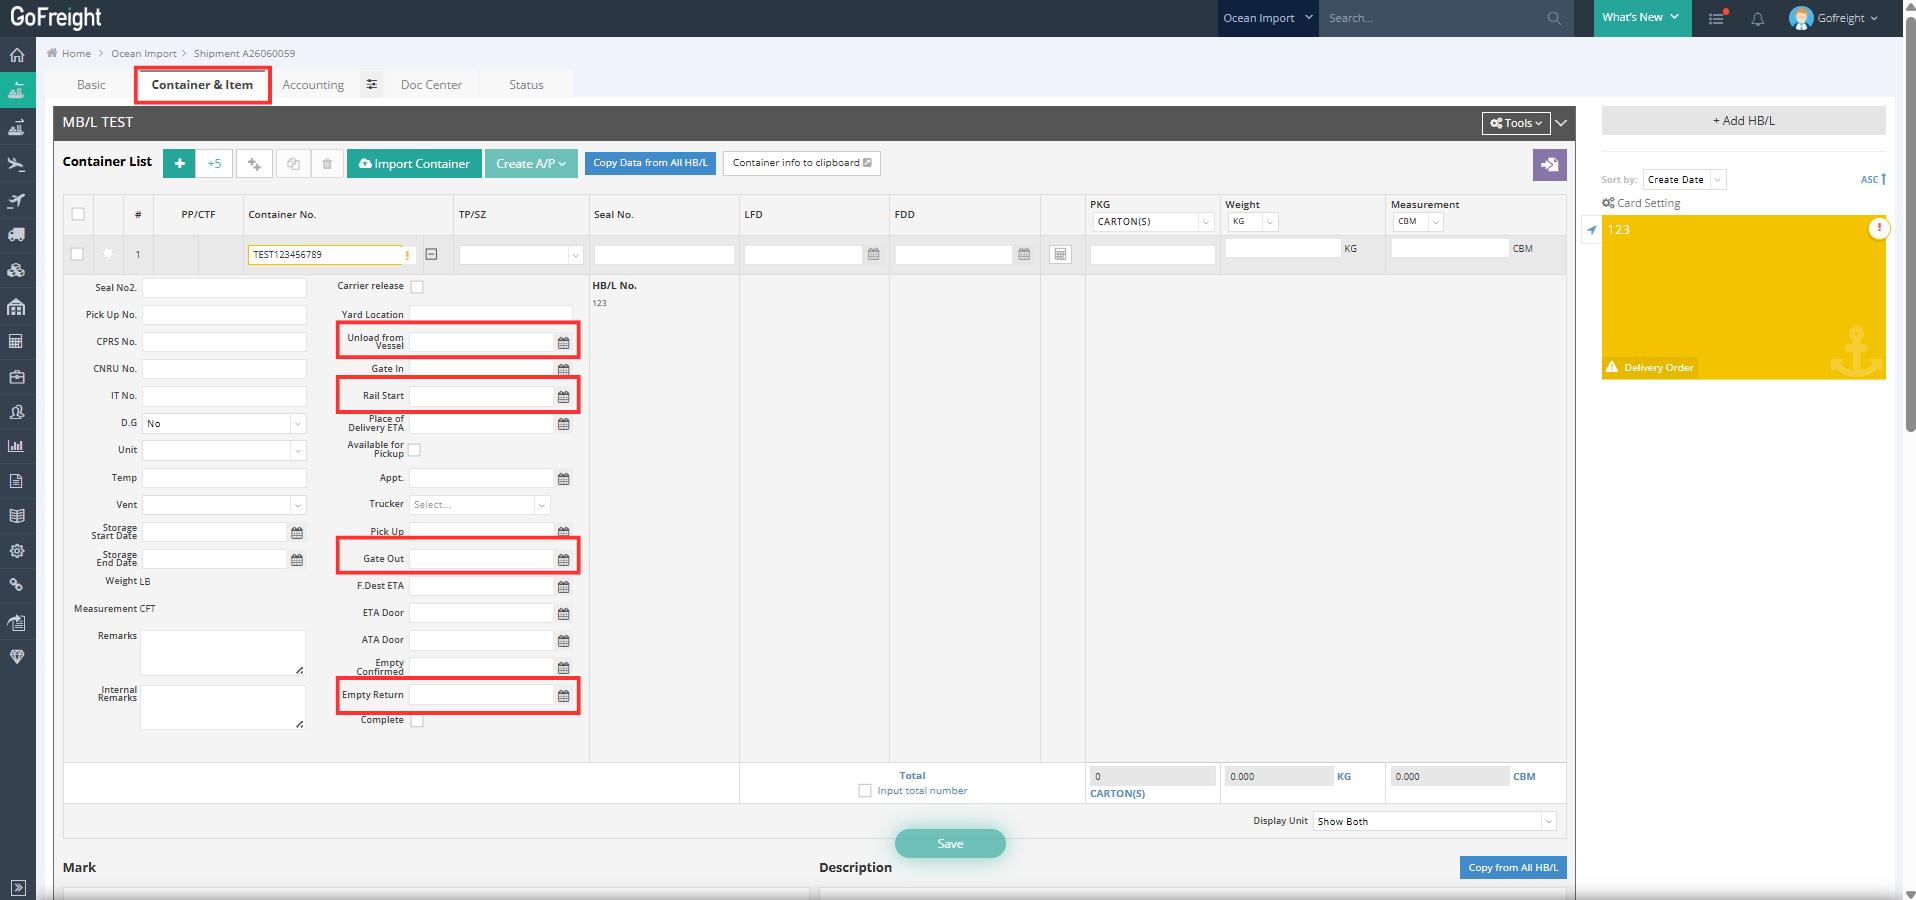
Manually enter the ATD, ATA, or other related preset milestone date/time fields on the shipment basic and container & item page. After the shipment is saved, the related preset milestone will advance automatically.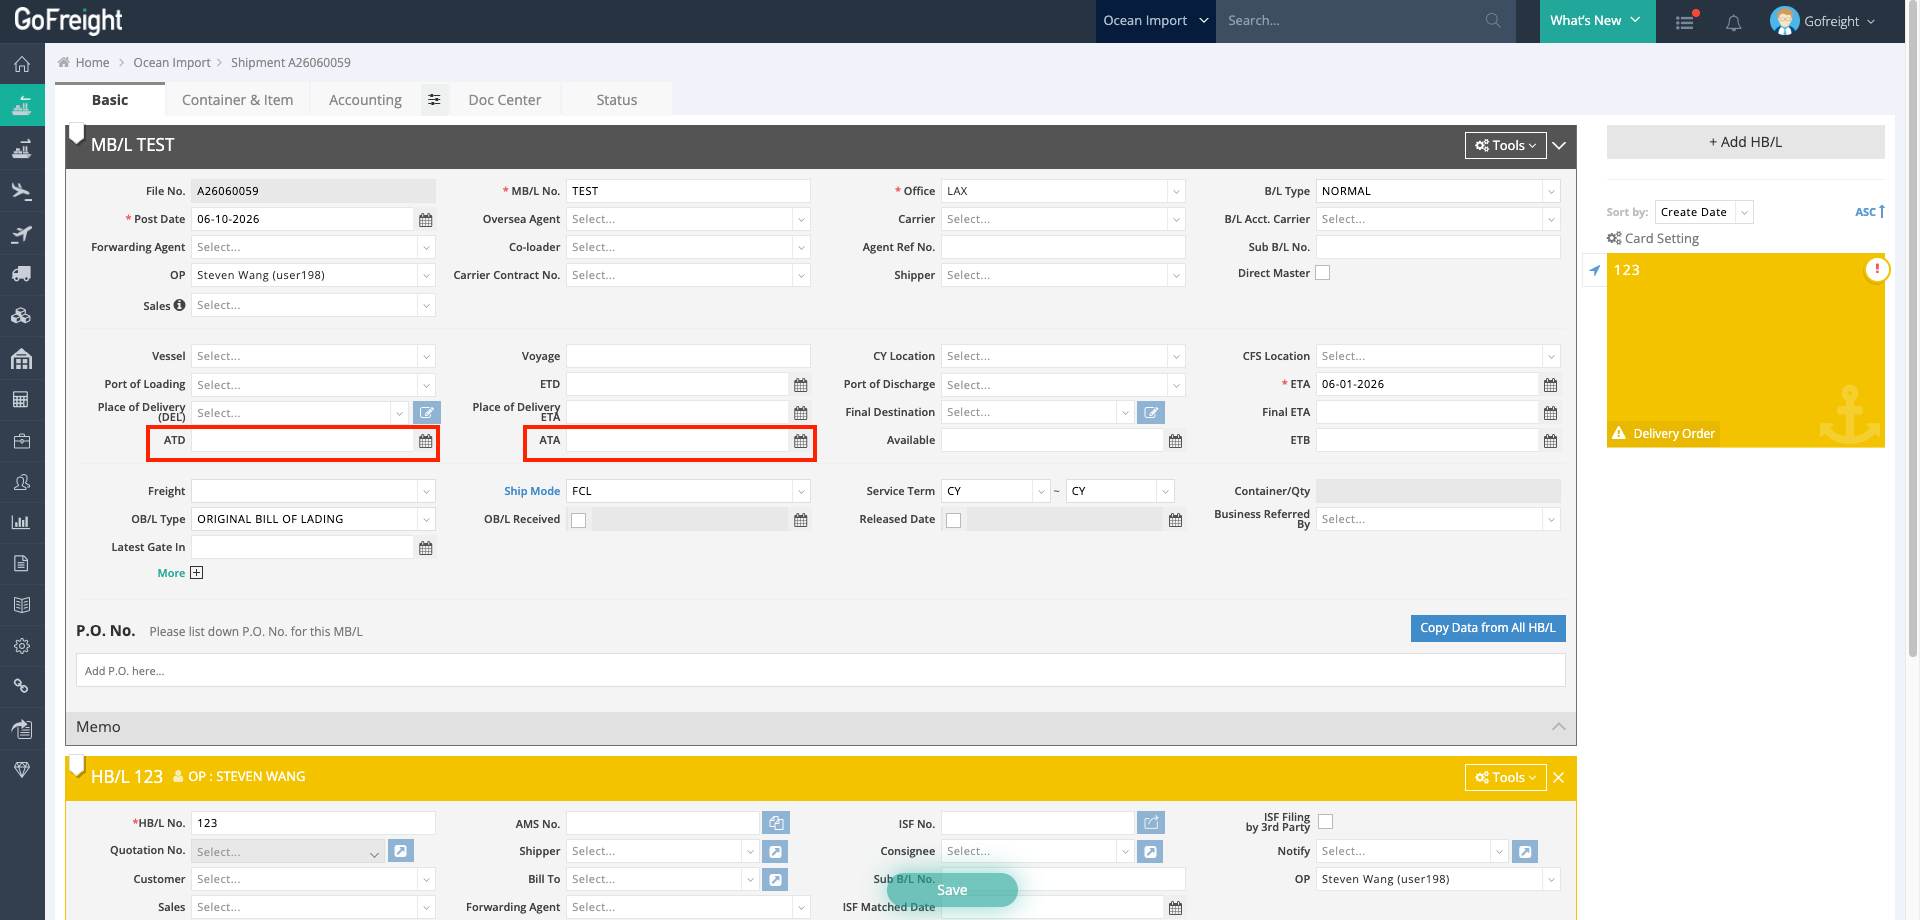
- If a custom milestone is placed before a preset milestone, the journey will still advance directly to the preset milestone once the preset milestone is triggered, whether the custom milestone has been completed or not.
Example:
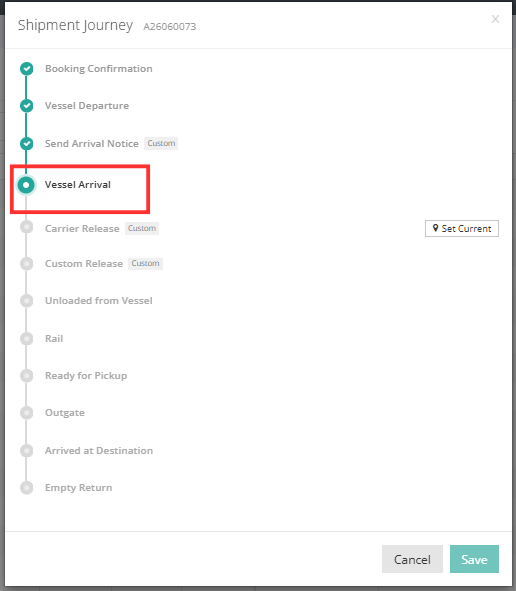
[Send Arrival Notice] is a custom milestone placed before the preset milestone [Vessel Arrival]. If [Send Arrival Notice] has not been finished, but GoFreight receives the vessel arrival EDI update or an operation user enters the ATA time, the journey will advance directly to [Vessel Arrival].
After the journey advances to Vessel Arrival, it cannot be moved back to Send Arrival Notice.
- Scenario 2: Custom Milestones Are Advanced Manually
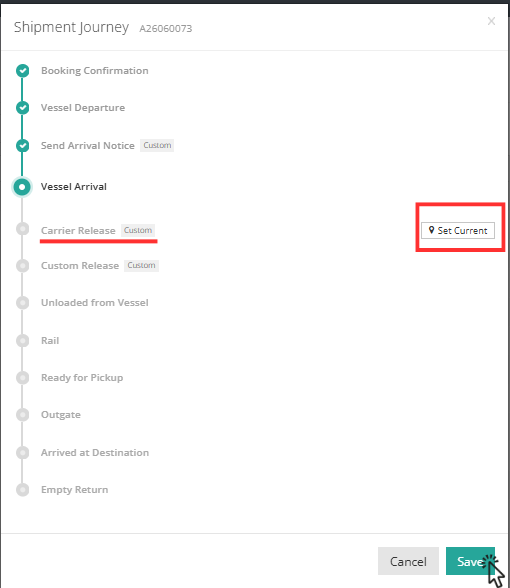
- Users need to manually click “Set Current”, then click “Save” to advance it
Exception: If a later preset milestone is triggered, the journey will advance directly to that preset milestone.
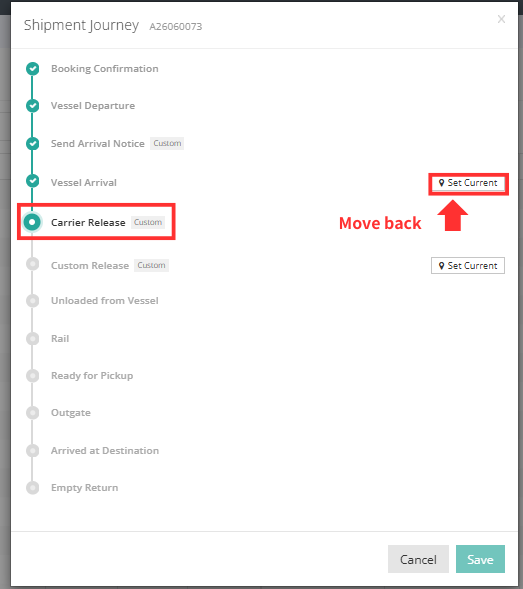
- Custom milestones can be moved back manually only when the current journey milestone is still a custom milestone.
Example:
The current journey status is [Vessel Arrival]. [Carrier Release] is a custom milestone placed after [Vessel Arrival]. If [Carrier Release] has been completed, a user needs to click Set Current, and click Save to advance the journey milestone to [Carrier Release].
If the current journey milestone is a custom milestone, users can move the journey back to a previous milestone.
View Custom Milestones in House B/L List, HAWB List, and Customer Portal
After custom milestones are added and saved, they will appear in shipment journey views. You can review them in the House B/L List, HAWB List, and Customer Portal.
- View in House B/L List (Ocean Shipment) and HAWB List (Air Shipment)
<House B/L List>
- Go to “Ocean Import” or “Ocean Export”, click “House B/L List”
- Click “Config” at the top of the list and select the Journey column
- Click “Apply”
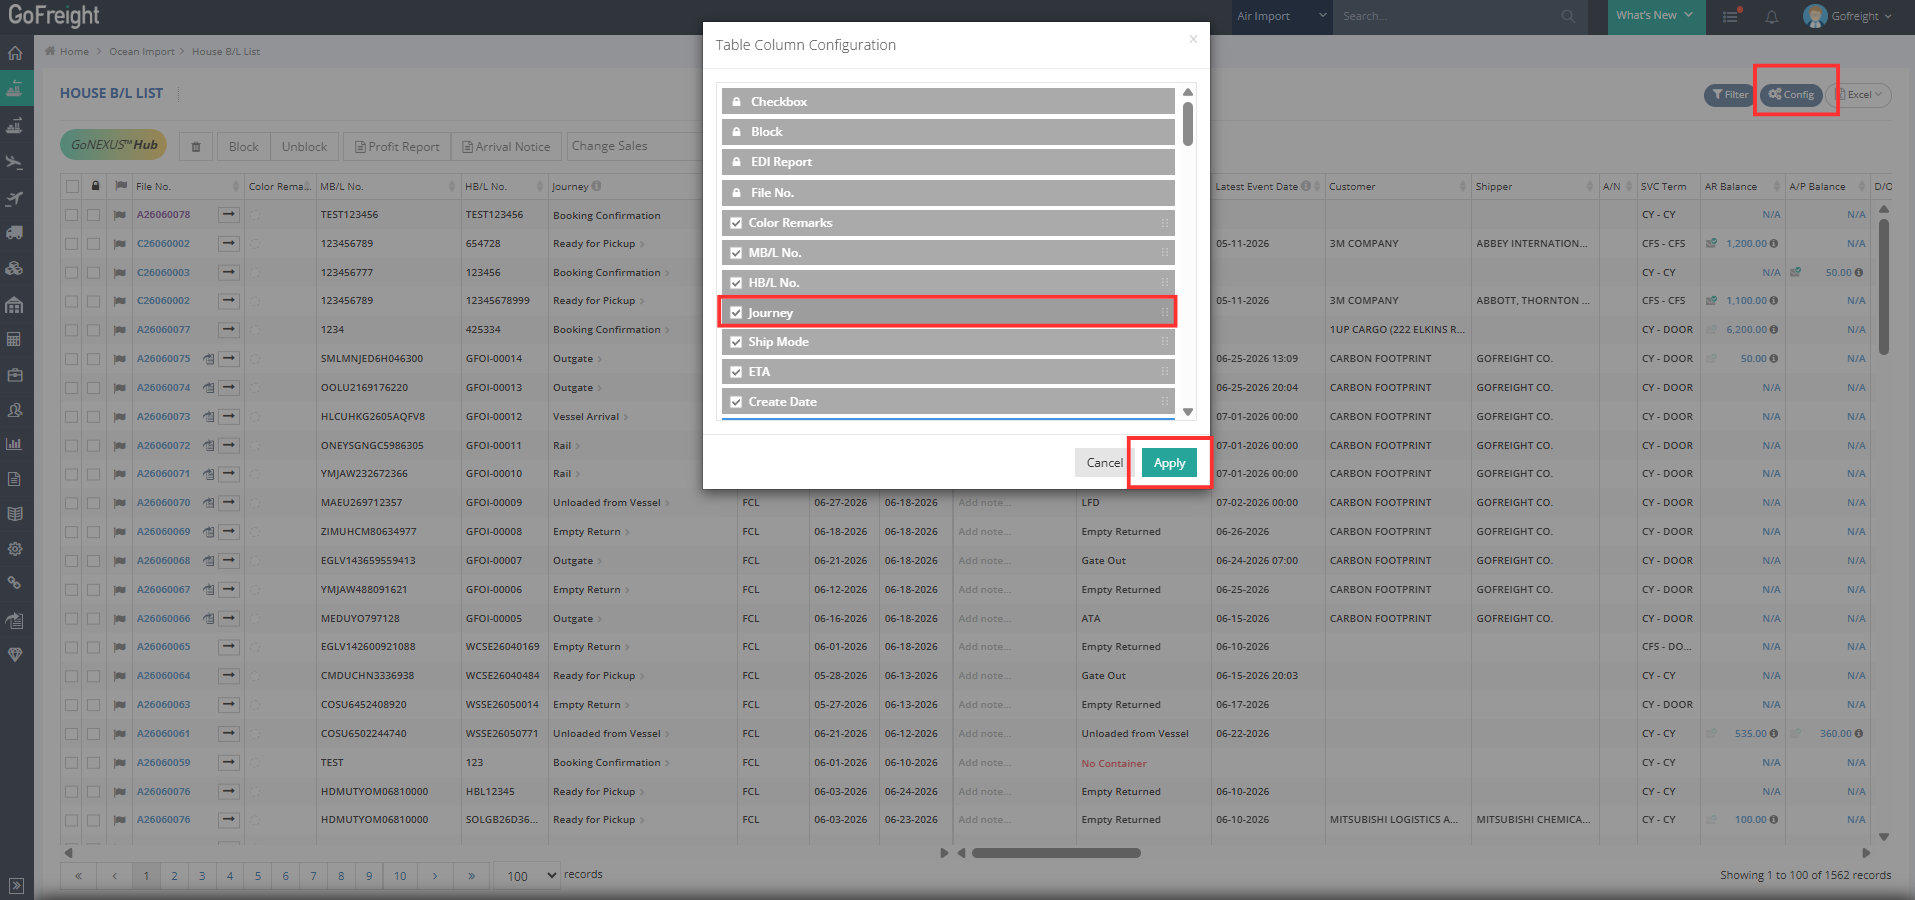
- The Journey column will show the latest milestone status for each shipment
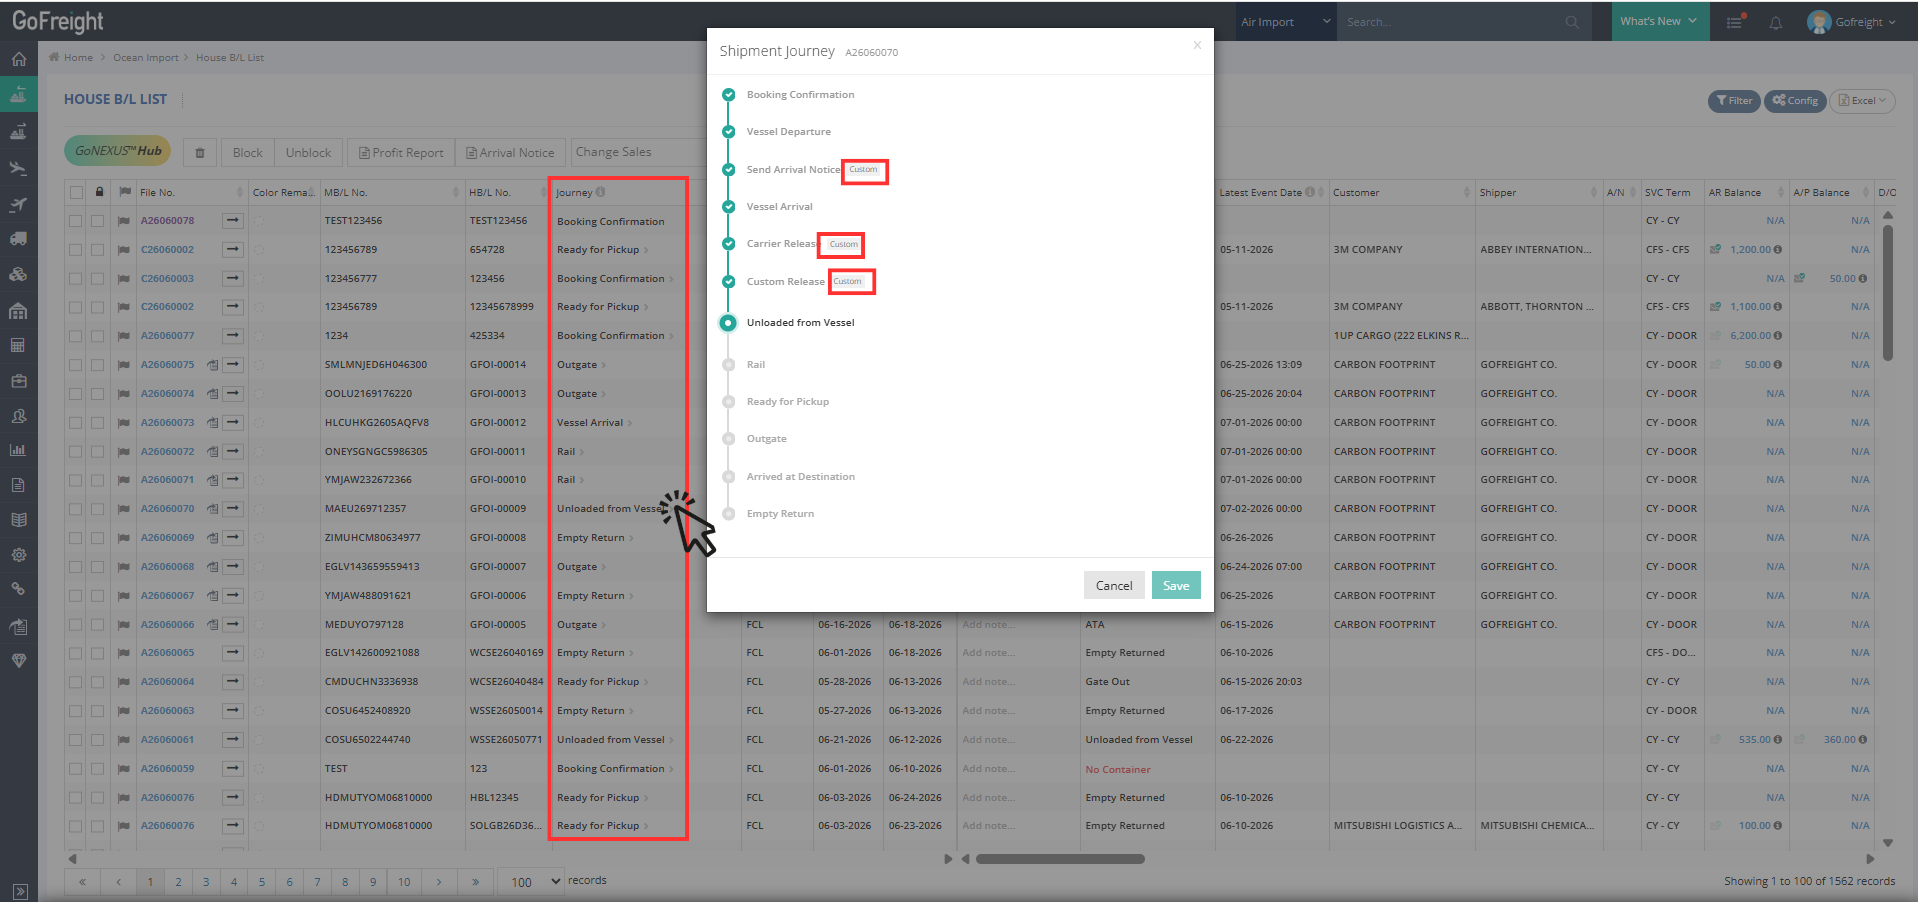
- Click the Journey column to view the full milestone list for the shipment, including: Preset milestones & Custom milestones (marked with a Custom label)
<HAWB List>
- Go to “Air Import” or “Air Export”, click “HAWB List”
- Follow the same steps to add and view the Journey column as House B/L List
- View in Customer Portal
Custom milestones can also be shared with your tracking users in Customer Portal
- Go to Customer Portal.
- Open the shipment you want to review.
- The custom milestones will appear directly in the shipment journey.