Summary
Admin and General Manager (GM) users can manage the full user lifecycle in GoFreight: add users, update profiles, control login status, reset passwords, and review activity while keeping access limited to the correct offices.
Use User Management to add new users, update existing user information, enable or disable access, and reset passwords without contacting GoFreight Support.
📌 Reminder: Depending on your organization’s internal process, you may want to notify relevant stakeholders (such as your Office Admin, General Manager, HR, or Accounting) before or after creating or disabling a user ID.
Prerequisites
- Sign in with an Admin or General Manager account.
- For systems with multiple offices, you can only view and manage users whose complete office assignment is within your own office access.
Before You Start
Individual User Accounts
For account security and clear activity tracking, each employee must use their own User ID and password. Login credentials should not be shared, and multiple employees should not use the same account. When a new employee needs access, create a new User ID instead of reusing an existing account.
✏️Note: If the same User ID is used at the same time from another device, browser session (including a private or incognito window), or IP address, GoFreight may automatically sign out the earlier session. To prevent unexpected sign-outs and help protect your company data, kindly remind your users to select My Profile > Log Out whenever they finish using GoFreight, even when stepping away temporarily.
User Offboarding & Onboarding Best Practice
When an existing user leaves your company or no longer requires system access, and a new team member joins, the appropriate procedure is to deactivate the existing user account and create a new User ID for the new employee.
💡 Tip: Renaming an old account’s display First Name and Last Name is discouraged, as maintaining separate User IDs ensures clear ownership of files and documents and allows your management team to track user activities and performance effectively.
Deactivated User Files & Access
Deactivating a user account does not delete or affect any existing files owned by that user. Other team members with the appropriate permissions will retain full access to those files.
Subscription & Billing Impact
Deactivating an old user account while adding a new user keeps your total active user count the same, so it will not increase your monthly user subscription fee.
Add a New User
Step 1: Open User Management
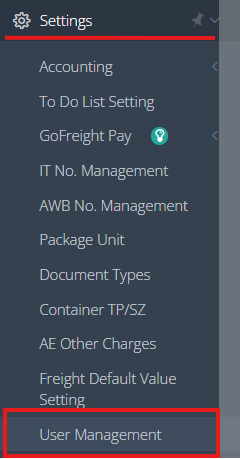
From the navigation menu on the left, go to Settings > User Management.
Step 2: Start a New User Profile
Click Create User to open a new User Profile.

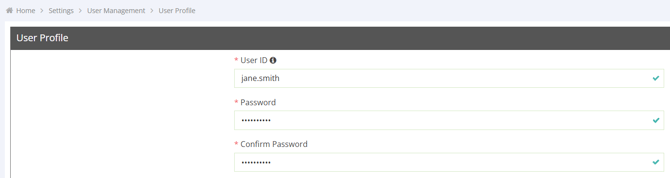
Step 3: Enter the Login Details
- User ID: Enter a unique ID between 3 and 30 characters, such as jane.smith. The ID cannot contain only numbers and cannot be changed after the user is created.
- Password: Please enter an initial password with a minimum of 10 characters.
💡Tips: It is recommended to use a reputable password manager’s password generator to create a strong password combining uppercase and lowercase letters, numbers, and special symbols for maximum security.
- Confirm Password: Enter the same password again.
Step 4: Enter the User Information
- First Name: Required. For example, Jane.
- Last Name: Optional. For example, Smith.
- E-mail: Required. For example, jane.smith@example.com.
- Phone, Ext., and Fax: Optional. This information will be displayed on the document header when the user is the Prepared By user. If the Phone and Ext. information is the same as the user’s main office, leave them blank.
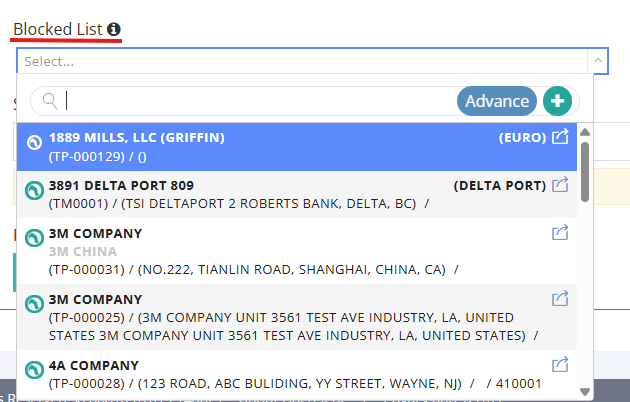
- Blocked List: Optional. Select the trade partners whose shipments the user should not be able to access. When a shipment's customer is on the Blocked List, the user cannot access the shipment or its invoices.
Step 5: Assign Office Access
- Main Office: Required. Select the user's default office. GoFreight uses this office by default when the user creates shipments or performs other office-based actions.
- Offices: Optional. This is only available when your system has multiple offices. Select any additional offices the user needs to access. The selected Main Office cannot be selected here either.
💡 Tip: Only offices within your own access are available for selection.
Step 6: Assign Roles
- Select at least one option in Role. If you assign multiple roles, the user receives the combined permissions of those roles. For example, by default, a user with the Operation role does not have access to create or edit Trade Partners. However, if the user is also assigned the Accounting role, they will have permission to create and edit Trade Partners because these permissions are included in the Accounting role's default permissions.
💡 Tip: Role Hierarchy
System permissions are designed with standard inheritance: higher-level roles automatically include all features and access rights of lower-level roles.
✏️Hierarchy Order: Manager > Member > Assistant
Example: The Operation Manager role includes all capabilities available to both the Operation and Operation Assistant roles. The Operation role includes all features available to the Operation Assistant role. The Operation Assistant role provides the basic functionality needed for the Operation team, excluding accounting-related functions such as creating invoices and D/C Notes.
📌 Best Practice: When assigning roles to a user, select only the highest-level role required, based on the user’s daily job description. There is no need to check multiple subordinate roles within the same team. The same practice is applied to the Sales team.
- Select View Permission Table to review the access provided by each role before configuration.

Some fields depend on the selected role:
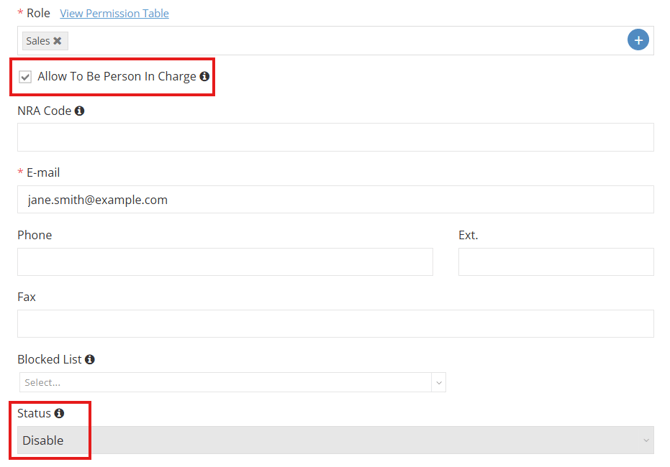
- Allow To Be Person In Charge appears for sales-related roles. When enabled, the account is locked to Disable, preventing login and billing. However, the user can still be selected as the Person In Charge on shipments for sales commission tracking purposes.
✏️Note: Managing Disabled Sales Users
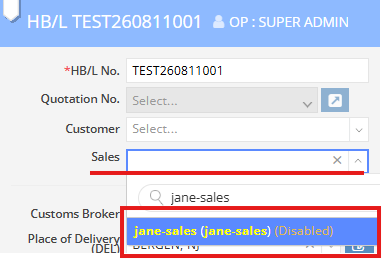
When a Sales Manager or Sales role is disabled and Allow To Be Person in Charge is enabled, the disabled Sales user will appear in the dropdown list of your entry field with “(Disabled)” displayed next to their name. If you no longer want a disabled Sales user to appear in the sales dropdown list, go to the user’s User Profile, clear the Allow To Be Person in Charge checkbox, and click Save.
💡Tip: Sales Person In Charge Status
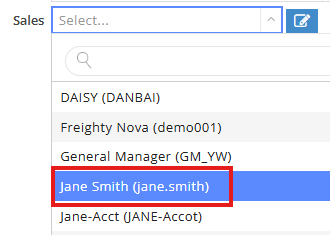
If your sales team requires login access, you do not need to check "Allow To Be Person In Charge". Sales Manager and Sales role users will automatically appear and be selectable in the Sales List upon account creation, while the Sales Assistant role user won’t.
- NRA Code : Optional. Enter up to four digits. This is only available when the Sales Manager, Sales, or Sales Assistant role is assigned to the user.
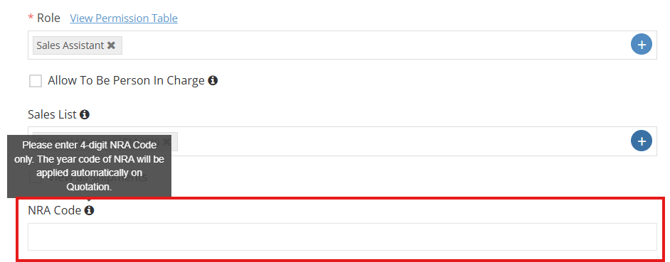
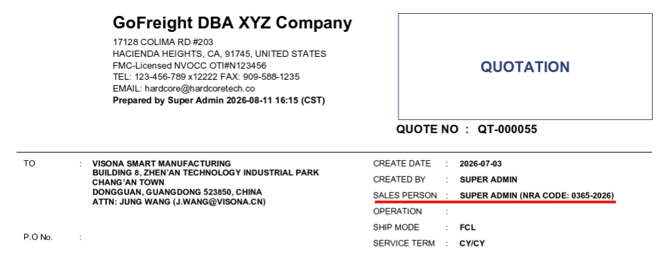
💡 Tip: Once configured, the NRA (Negotiated Rate Arrangement) Code will be displayed on the printed quotation in the following format: NRA Code + Quotation Year, when a Sales team user is assigned to the Quotation file.
Step 7: Review Optional Access Settings
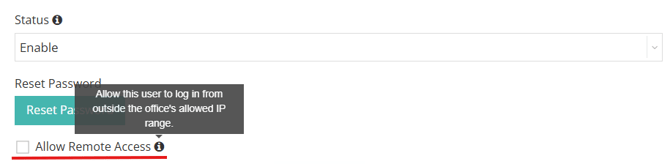
Allow Remote Access appears when the user's Main Office or additional Offices use an IP Network restriction. Enable it only if the user should be allowed to log in from outside the office's permitted IP range.
💡Tip: This checkbox is visible only when your office has an IP Network Security Setup. Contact the GoFreight Support Team for assistance with this Security Setup if needed.
Step 8: Save the User
Click the Save button. GoFreight displays a green Saved successfully message and opens the new user's Edit page.
Edit an Existing User
Step 1: Open the User
Navigate to Settings > User Management, then open the user you want to update.
Step 2: Update the Profile
Edit the user's name, contact details, office assignments, roles, or available access settings.
The User ID field is greyed out and read-only after creation. If you create a user ID by mistake, disable it immediately and create a new one if needed.

Step 3: Save the Changes
Click the Save button. GoFreight displays Saved Successfully and keeps you on the same Edit page.
Enable or Disable a User
Step 1: Open the User's Edit Page
Navigate to Settings > User Management, then open the user.
Step 2: Change the Status
Use Status to select Enable or Disable.
- Enable allows the user to log in.
- Disable prevents the user from logging in. Disabled users are not billed.

Step 3: Save the Change
Click Save to apply the new status.
Reset a User's Password
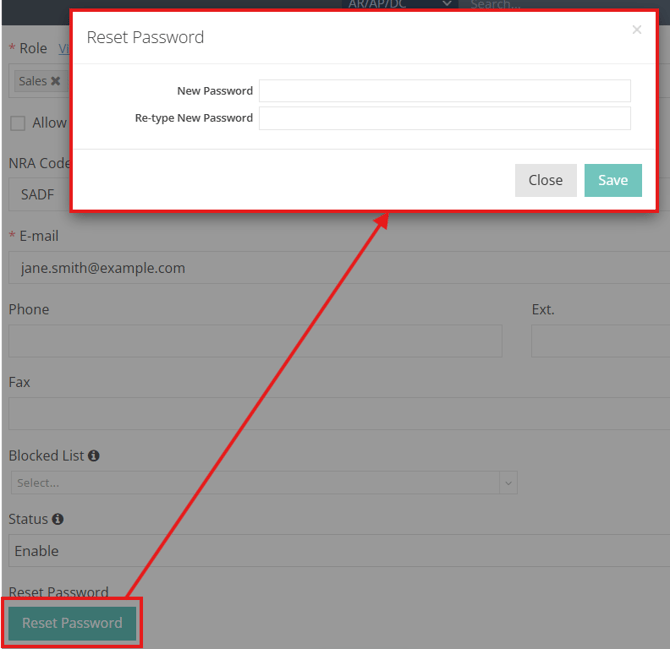
Open the user's Edit page and click Reset Password. Complete the password fields shown on the page, then save the change.
Both Admin and General Manager users can reset passwords for users within their office access.
Review User Activity Log
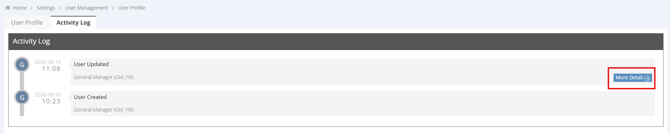
Open the Activity Log tab on a user's profile to review:
- User creation
- User updates
- Status changes
- Password resets

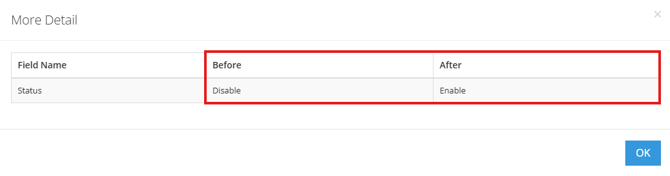
Each entry includes the action time and the ID of the person who acted. Select More Detail when available to compare field values before and after an edit.